Tag Archives: Vegetarian

German Potato Salad

German Potato Salad - Light, tangy and crunchy!

German Potato Salad – Light, tangy and crunchy!

Potatoes have a bad reputation.  They’ll make you fat.  They’re a nightshade vegetable. They’ll raise your blood sugar.  They’re a white simple carbohydrate so we shouldn’t eat them.  I turn up my nose at all of that.  Potatoes are the bomb!!

They’re an amazing source of potassium, vitamin B6, copper, vitamin C, manganese, vitamin B3 and fiber and these are all things we need more of.  Due to the high amount of processed food people in America eat, most don’t get enough potassium in their diet and this can lead to high blood pressure and other cardiovascular problems. Sadly, when people eat potatoes the most common way they eat them is fried, as in french fries and potato chips.  It’s not the potatoes fault we choose these horrendous versions of them. Poor potatoes.

But if you keep the skin on (organic and well scrubbed), pair potatoes with protein and eat a moderate serving of them in a non-deep fried version, they can be part of a healthy diet.  Potatoes are a whole food. A single ingredient.  From the earth.  These are all good things.  I’d much rather see people eating potatoes they made at home, than purchasing processed white hamburger rolls, pasta, white rice etc.  Please don’t put the potato in the same category as these white simple carbs.  It’s really all about making good choices.  If you’re going to eat a huge helping of potato salad and have two hot dogs on white rolls – yeah, you’re going to have a massive blood sugar spike and feel like crap (especially after you top it all with a bowl of ice cream).  But if you have a moderate serving of potato salad, with some grilled chicken or a burger on a portobello mushroom cap (and with some veggies), you’re going going to fare much better (even if you do have a little ice cream later).  It’s actually pretty simple.  Just eat smartly and you can enjoy potatoes for a good dose of potassium and fiber.

My love for the potato grows strong this time of the year because it’s cookout season and that means lots of opportunities for it’s appearance in cold salads.  While a creamy, mayo or buttermilk drenched salad is delicious occasionally (especially if there are delicious herbs and veggies in there), sometimes my stomach churns at the thought of yet another overly mayonnaised potato salad.  Don’t get me wrong, I am a fan of mayo (the homemade kind) but come on, sometimes it seems like some recipes are just potatoes and mayo.  That’s ridiculous.  That is not a recipe.  That is phoning it in.  Driving to the store and buying premade pasta salad would actually take more effort. When I feel mayo-ed out, I turn to German Potato Salad to change things up.

This isn’t a fancy recipe and you don’t need much to make it, some yukon or red potatoes, vinegar, oil and then some herbs or veggies.  Maybe some mustard (and bacon if you are feeling it).  You probably have all the ingredients already in your kitchen.  So for those times when you just might dump the whole bowl of mayo salads over the head of their maker, you can smile and hand them this instead.

Steam the potatoes in a colander for a less crumbly result.

Steam the potatoes in a colander for a less crumbly result.

Add lots of crunchy veggies and some vinegar, oil & mustard.

Add lots of crunchy veggies and some vinegar, oil & mustard.

Add some salt and pepper and give a good stir and you're ready to eat.

Add some salt and pepper and give a good stir and you’re ready to eat.

Ingredients
2 – 2.5 lbs Medium sized Organic Red Potatoes (or Yukon Gold)
3 scallions, sliced thinly
3 celery stalks, roughly chopped
a big handful of fresh organic parsley, chopped (or 2 tbsp dried)
2 tbsps extra virgin olive oil
2 tbsps apple cider vinegar
1 tbsp white vinegar*
1 tsp dijon or whole grain mustard
1 tsp salt
lots of freshly ground black pepper

Directions
Wash the potatoes well, cut them in half and boil in a pot of salted water for 15 minutes (until they give slightly with a fork). When they are mostly tender, drain the water and put the potatoes in a colander, then put the colander back over the pot you boiled them in and cover the potatoes with a clean dish towel.  Let them steam for 15 minutes.  Finishing them off this way instead of boiling for longer time prevents that overly mushy crumbly thing that happens to potatoes when you stir them a lot.

After the potatoes are done steaming, cut each potato half into quarters (depending on the size of your potatoes) and toss into a big bowl.  Add the scallions, parsley and celery to the bowl, then add the vinegars, oils, mustard, salt and pepper and give a good stir.  Serve at room temperature or chill for at least two hours to give the flavors time to develop.  If the salad seems too dry when you are ready to eat it (potatoes are thirsty buggers), add a couple tablespoons of water or chicken broth or a little more oil and vinegar. Serve with whatever amazing bbq you’ve got going on and don’t forget to invite me over!

Makes 4 – 6 good sized servings

*I didn’t put the gluten free tag on this because it contains white vinegar.  Most celiacs and gluten sensitive people tolerate white vinegar just fine but for the very sensitive, it could be an issue since it is made from grain, including rye or wheat.  The distillation process breaks down the gluten proteins so that the product is virtually “gluten free” from a testing standpoint (under 20 parts per million) but that doesn’t mean that it’s safe for everyone.  Complicated stuff!
Untitled drawing (1)

Red White and Blue Popsicles

Strawberry, Coconut & Blueberry Popsicles

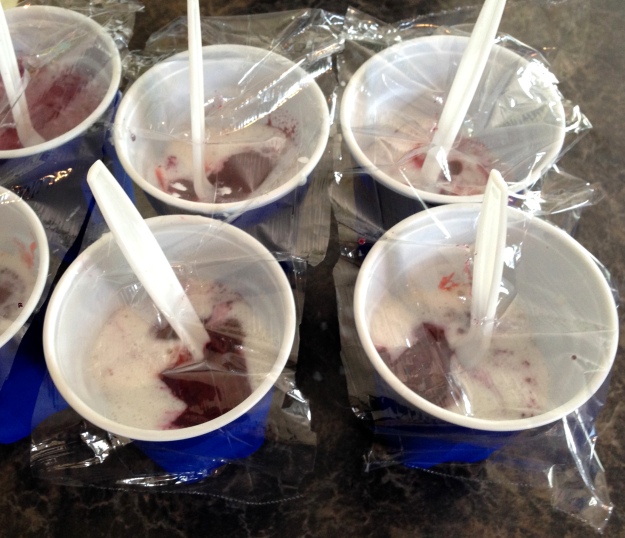
My ugly but delicious dairy free popsicles!

My ugly but delicious dairy free popsicles!

No one is ever going to tell you I make pretty food.  I make tasty food that is usually pretty good for you but it usually looks like a train wreck.  But that’s ok with me if it’s ok with you.  Don’t judge my ugly 4th of July popsicles by their outer appearance.  It’s what’s on the inside that counts.  And if you make these yourself you won’t have to go dig up some change when you hear the ice cream man’s music come rolling through the neighborhood. The best part about these popsicles is that you don’t need to worry about gross ingredients like food coloring and high fructose corn syrup and since they contain real fruit you are giving your kids (and yourself) a treat that you can feel good about.  Have you ever looked at the ingredient list of most store popsicles?  They’re usually not even food. I’m looking forward to trying these with other fruits – I’m thinking mango & lime juice would be good too! This made 6 good sized popsicles out of small solo cups.  Despite using small solo cups they were still pretty large popsicles.  I think if you are using molds you’ll get a few more out of the mixture. It’s strawberry season right now in NH so by all means, use fresh if you can get them!

Ingredients
3/4 can full fat Coconut Milk
8 – 10oz organic fresh or frozen strawberries
8 – 10oz organic fresh or frozen blueberries
4 tbsp raw honey or maple syrup
1 tsp vanilla
pinch of sea salt

Directions
If your honey is very thick or crystallized, you’ll want to melt it first.  You can do this by heating it in the microwave but I prefer to put it in a glass measuring cup and then setting the measuring cup in a bowl of hot water for a couple of minutes.  Once the honey is melted, blend the strawberries with 1 tbsp + 1 tsp of honey, plus a dash of vanilla and a tiny bit of salt.  Once they are well blended, scrape the blender out and set the strawberry mixture aside.  Rinse the blender and then do the same with the blueberries (+ honey, vanilla and salt) and again with the coconut milk, setting each one aside in a separate container.   Once all have been blended, spoon a heaping tbsp of the strawberry mixture into each popsicle mold, then a couple of spoonfuls of coconut milk, then a heaping tbsp of the blueberry mixture and so on until you run out of the mixtures.  Freeze for at least 4 hours before eating.

Freaking out because you don’t have popsicle molds? If you don’t have popsicle molds (I certainly don’t!), you can use small plastic or paper cups instead!  The popsicles won’t look as fancy and they may be a little awkward shaped but it will do. You just pour the mixtures in then cover with plastic wrap and make a small hole for a popsicle stick or plastic fork/spoon, then insert one into each hole.  The plastic wrap will keep the stick in place.  Pop into the freezer and wait patiently.  When the popsicles are frozen you may need to run the sides of each cup under warm water for a few seconds to release the popsicle from the plastic cup.  If you use paper cups you can probably just peel them off.  We used plastic forks in ours in place of popsicle sticks (since we didn’t have those either) and the cool thing about that was as your popsicle starts to melt you can just stick it back in the cup and eat it with the fork that has been acting as your stick.  So fancy.

You don't need popsicle molds to make your own popsicles.  Look around your kitchen, you'll find something that you can use.

You don’t need popsicle molds to make your own popsicles. Take a good look around your kitchen and I’m sure you probably have stuff you can use in a pinch!

I will totally be having one of these tonight! Yum!

Untitled drawing (1)

Warm Brussels Sprouts Salad with Cranberries and Sunflower Seeds

Warm Brussels Sprout Salad

Warm Brussels Sprout Salad

I know we’re still a few months from Brussels Sprout season but I can’t help myself! Despite trying to eat what’s in season most of the time, I go out of my way to eat Brussels sprouts year round.  I may have hated them as kid (me and everybody else) but as an adult, they are one of my favorite veggies! Roasted, pan fried, steamed – I don’t care! I think they are fab!  This is one of my favorite ways to make them.  It’s super fast (the thing that takes the most time is trimming the sprouts) and simple to make.  Plus, you don’t even need to be much of a cook to pull this one off.

As usual, with most of the food I make, this recipe is a loose guide – if you don’t have cranberries or sunflower seeds, skip them or substitute raisins, chopped dried apricots, fresh blueberries, pumpkin seeds, chopped cashews or hemp seeds.  If you don’t have lemon, use fresh lime juice/lime zest or even vinegar.  It’s no big deal.  The main reason they’re in this salad is to add some additional texture and take some of the bite out of the sprouts.

Not only do they taste amazing, but Brussels sprouts are crazy good for you! They’re an amazing source of vitamin K and vitamin C, and a pretty good source of folate, potassium, B Vitamins (there’s some B1, B2, B3 and B6 in there), fiber and choline.   Try this salad next time you’re looking at sprouts and wondering what to do with them.

Ingredients
4 cups Brussels sprouts, base trimmed, loose / damaged leaves removed
1 tbsp olive oil, butter or melted coconut oil
1/2 cup dried organic cranberries
1/2 cup organic raw sunflower seeds
1 lemon, juiced & zest reserved
1.5 tbsp Extra Virgin Olive Oil (I’m a fan of California Olive Ranch these days)
sea salt and black pepper to taste

photo 1c copy
Directions
After trimming your Brussels sprouts, slice each one 3 or 4 times (so it looks like somewhat shredded cabbage when you are done).  Heat the olive oil (not extra virgin) in a 3 or 4qt pan over medium heat.  When it’s hot, add the sliced/shredded sprouts and saute for about 5 – 7 minutes (or until your desired doneness), stirring occasionally. I like to saute them just until some pieces begin to brown and get crispy but the rest are still pretty firm.

Take them off the heat and toss with lemon juice, lemon zest and the extra virgin olive oil.  Sprinkle with a little salt and pepper and dress with the cranberries and sunflower seeds. Serve warm or at room temperature.  This is a great salad to bring to cookouts when sprouts are in season in late summer!

Makes 4 hearty servings.  Make this a well balanced meal by adding grilled chicken or cannellini beans on top.

Easy BBQ Spice Roasted Chickpeas

photo 1 copy I hosted a vegetable gardening workshop at my home yesterday afternoon (thanks to the kind and knowledgeable Leslie Stevens of Sidewalk Farms in Portsmouth) and since I’m a foodie, I provided lots of snacks for my guests (most of them healthy).  Apparently, my roasted chickpeas were a hit so I thought I would share the recipe here.

One of the things I want to teach people in my coaching practice is that eating healthily doesn’t have to be a ton of work.  Simplify and get creative. If you’ve never had roasted chickpeas, you’re in for a treat.  They get crispy and crunchy and are a great stand in for protein rich snacks like roasted or spiced nuts. In addition to being little protein powerhouses, chickpeas are a great source of fiber, folate, copper, phosphorus, manganese, iron and zinc – minerals and nutrients we all could use more of. This is a snack you don’t have to feel bad about. And they’re super kid friendly!

There’s barely any work to make them (you just need a half hour or so of oven time) and if you have any leftovers, they make a great high protein topper for salad or mixed into a stir fry or pilaf. They will lose some of their crunch after several hours but you can refresh them by putting them back in a 400 degree oven for a few minutes. For this recipe, I used a BBQ Spice rub (modified and inspired by the one here) but you can roast chickpeas plain or with any other spices you like.  I also like them with coriander, cardamom and cumin. They’re crazy versatile.  If you put together this spice rub, you will have leftovers.  Try the extra rub on chicken or on sweet potatoes.

Ingredients
2 15oz cans organic chickpeas / garbanzo beans
1 tbsp olive oil

BBQ Spice Rub / Mix
(use organic spices if you can)
3 tbsp organic brown sugar
2 tbsp paprika
1 tbsp smoked paprika
2 tsp chili powder
2 tsp garlic powder
1 tsp dry mustard
1/2 tsp onion powder
1 tsp black pepper
1/2 tsp salt cayenne pepper to taste (optional) photo 2 copy

Directions Preheat the oven to 400 degrees.  Rinse and drain the chickpeas, then dry off well with paper towels.  If you have OCD, pick off all the little chickpea skins (but they can stay on if you don’t).  Toss the chickpeas with the olive oil and then rub with a couple tablespoons of the bbq spice mix (at least 2, but feel free to go heavier!).  Spread the chickpeas out on a cookie sheet and then bake for 30-40 minutes until crispy and lightly browned.    Serve immediately or at room temp.

Just a note: The brown sugar in the spice mix will encourage browning (burning even) so check on them once towards the end of cooking so that they don’t brown beyond your liking.  The burned ones still taste pretty good if you ask me. If you try these, let me know what you think!


Have you gotten my newest free guide You Have What it Takes? If you’re an emotional eater, overeater or longtime dieter who wonders if she has what it takes to change her relationship with food, then this for you. And it’s free. Click on the image below, then enter your name and email and it’s yours!


Recipe: Wild Rice Stuffed Acorn Squash with Apricots & Pumpkin Seeds

Wild Rice Stuffed Acorn Squash

Wild Rice Stuffed Acorn Squash

I’m a meat eater but I like to try to have a couple of vegetarian days a week.  I feel more balanced when I don’t eat too much of any one thing.  The husband is a little less thrilled about vegetarian meals than I am so I have to make sure the dishes are substantial and hearty or he’ll be in the kitchen looking for a snack as soon as he puts down his fork.  I’ve had to get creative!  This one is a winner!

This meal can take center stage and hold it’s own next to any meat filled main course.  Buttery acorn squash, hearty wild rice, crunchy vegetables, apricots, pumpkin seeds and warming spices will taste good on your tongue and it will make your kitchen smell like happiness.  The flavors are reminiscent of stuffing at Thanksgiving (my recipe anyway).  If you’re like me and your kitchen wouldn’t know a sharp knife if one came crashing through the window, then you can relax – we cook the squash whole in this recipe!  Save your fingers and a trip to the emergency room by cutting in to the squash after it’s cooked.  Is it conceited if I call myself genius? Probably, but I don’t care.  This is a good one!

Sometimes I serve it topped with a dollop of hummus, half an avocado or a fried egg (or a combo of two!).  So satisfying I’ve even eaten the leftovers for breakfast!

Ingredients

2 whole acorn squash
1 cup Lundberg Wild Rice blend
1 cup Apple Cider or 1 cup water + 1 medium apple diced
3/4 cup of water
1 medium onion, diced
3 celery stalks, diced
1 poblano pepper, diced
1 green bell pepper, diced
1 tablespoon olive oil
1/2 cup organic raw shelled pumpkin seeds
8 organic turkish apricots, roughly chopped
1 tsp ground sage
1/2 tsp ground allspice
1 tsp dried basil leaves
black pepper and salt to taste
optional:  1 tbsp of butter for each squash half

Turn oven to 375 degrees.  Wash the skin of your acorn squash, dry and then put on a cookie sheet and carefully place in the oven (they might try to roll around).  It’s okay if the oven isn’t fully heated yet.  Cook the squash for 45 minutes, then check it for doneness.  You should be able to insert a knife easily into it’s flesh.  If still firm, keep cooking until soft.  When done, let cool for a few minutes, slice in half and then scoop out the seeds and fibrous membranes.  Sprinkle with salt and pepper to taste.

While the squash is cooking, bring the apple cider (or chopped apple & extra water) & water to a boil in a medium saucepan.  Pour in the wild rice, return to a boil, cover and reduce the heat to low so it simmers.  Cook for 45 minutes then turn off the heat and leave the cover on for a few more minutes.

When the rice is almost done cooking, heat a large skillet to medium heat, add the olive oil and when oil is hot saute the onion, celery, bell pepper and poblano peppers until they begin to soften.  Add sage, basil and allspice and cook for 1 minute.  Stir in the chopped apricots and pumpkin seeds and add the rice when it’s done cooking.  Fill each acorn squash half with 3/4 – 1 cup of the rice and vegetable mixture.  I like to place a tablespoon of pastured butter (try Kerrygold if you don’t have a local source) in each squash half before filling with the rice mixture.  This is optional of course, but it adds a lot of flavor and richness which will keep your satisfied for hours. This meal is vegan if you leave it out.

Pop the filled squash back in the oven for 10 minutes or so just to warm the squash back up.  Enjoy!

Makes 4 servings.

Untitled drawing (1)