Tag Archives: soy free

German Potato Salad

German Potato Salad - Light, tangy and crunchy!

German Potato Salad – Light, tangy and crunchy!

Potatoes have a bad reputation.  They’ll make you fat.  They’re a nightshade vegetable. They’ll raise your blood sugar.  They’re a white simple carbohydrate so we shouldn’t eat them.  I turn up my nose at all of that.  Potatoes are the bomb!!

They’re an amazing source of potassium, vitamin B6, copper, vitamin C, manganese, vitamin B3 and fiber and these are all things we need more of.  Due to the high amount of processed food people in America eat, most don’t get enough potassium in their diet and this can lead to high blood pressure and other cardiovascular problems. Sadly, when people eat potatoes the most common way they eat them is fried, as in french fries and potato chips.  It’s not the potatoes fault we choose these horrendous versions of them. Poor potatoes.

But if you keep the skin on (organic and well scrubbed), pair potatoes with protein and eat a moderate serving of them in a non-deep fried version, they can be part of a healthy diet.  Potatoes are a whole food. A single ingredient.  From the earth.  These are all good things.  I’d much rather see people eating potatoes they made at home, than purchasing processed white hamburger rolls, pasta, white rice etc.  Please don’t put the potato in the same category as these white simple carbs.  It’s really all about making good choices.  If you’re going to eat a huge helping of potato salad and have two hot dogs on white rolls – yeah, you’re going to have a massive blood sugar spike and feel like crap (especially after you top it all with a bowl of ice cream).  But if you have a moderate serving of potato salad, with some grilled chicken or a burger on a portobello mushroom cap (and with some veggies), you’re going going to fare much better (even if you do have a little ice cream later).  It’s actually pretty simple.  Just eat smartly and you can enjoy potatoes for a good dose of potassium and fiber.

My love for the potato grows strong this time of the year because it’s cookout season and that means lots of opportunities for it’s appearance in cold salads.  While a creamy, mayo or buttermilk drenched salad is delicious occasionally (especially if there are delicious herbs and veggies in there), sometimes my stomach churns at the thought of yet another overly mayonnaised potato salad.  Don’t get me wrong, I am a fan of mayo (the homemade kind) but come on, sometimes it seems like some recipes are just potatoes and mayo.  That’s ridiculous.  That is not a recipe.  That is phoning it in.  Driving to the store and buying premade pasta salad would actually take more effort. When I feel mayo-ed out, I turn to German Potato Salad to change things up.

This isn’t a fancy recipe and you don’t need much to make it, some yukon or red potatoes, vinegar, oil and then some herbs or veggies.  Maybe some mustard (and bacon if you are feeling it).  You probably have all the ingredients already in your kitchen.  So for those times when you just might dump the whole bowl of mayo salads over the head of their maker, you can smile and hand them this instead.

Steam the potatoes in a colander for a less crumbly result.

Steam the potatoes in a colander for a less crumbly result.

Add lots of crunchy veggies and some vinegar, oil & mustard.

Add lots of crunchy veggies and some vinegar, oil & mustard.

Add some salt and pepper and give a good stir and you're ready to eat.

Add some salt and pepper and give a good stir and you’re ready to eat.

Ingredients
2 – 2.5 lbs Medium sized Organic Red Potatoes (or Yukon Gold)
3 scallions, sliced thinly
3 celery stalks, roughly chopped
a big handful of fresh organic parsley, chopped (or 2 tbsp dried)
2 tbsps extra virgin olive oil
2 tbsps apple cider vinegar
1 tbsp white vinegar*
1 tsp dijon or whole grain mustard
1 tsp salt
lots of freshly ground black pepper

Directions
Wash the potatoes well, cut them in half and boil in a pot of salted water for 15 minutes (until they give slightly with a fork). When they are mostly tender, drain the water and put the potatoes in a colander, then put the colander back over the pot you boiled them in and cover the potatoes with a clean dish towel.  Let them steam for 15 minutes.  Finishing them off this way instead of boiling for longer time prevents that overly mushy crumbly thing that happens to potatoes when you stir them a lot.

After the potatoes are done steaming, cut each potato half into quarters (depending on the size of your potatoes) and toss into a big bowl.  Add the scallions, parsley and celery to the bowl, then add the vinegars, oils, mustard, salt and pepper and give a good stir.  Serve at room temperature or chill for at least two hours to give the flavors time to develop.  If the salad seems too dry when you are ready to eat it (potatoes are thirsty buggers), add a couple tablespoons of water or chicken broth or a little more oil and vinegar. Serve with whatever amazing bbq you’ve got going on and don’t forget to invite me over!

Makes 4 – 6 good sized servings

*I didn’t put the gluten free tag on this because it contains white vinegar.  Most celiacs and gluten sensitive people tolerate white vinegar just fine but for the very sensitive, it could be an issue since it is made from grain, including rye or wheat.  The distillation process breaks down the gluten proteins so that the product is virtually “gluten free” from a testing standpoint (under 20 parts per million) but that doesn’t mean that it’s safe for everyone.  Complicated stuff!
Untitled drawing (1)

Red White and Blue Popsicles

Strawberry, Coconut & Blueberry Popsicles

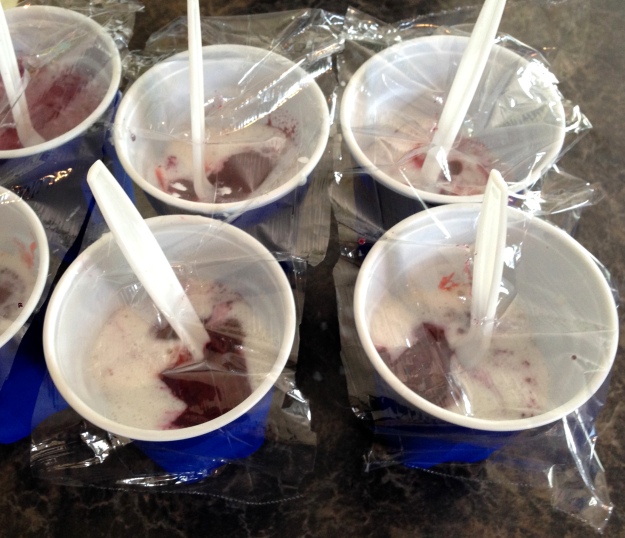
My ugly but delicious dairy free popsicles!

My ugly but delicious dairy free popsicles!

No one is ever going to tell you I make pretty food.  I make tasty food that is usually pretty good for you but it usually looks like a train wreck.  But that’s ok with me if it’s ok with you.  Don’t judge my ugly 4th of July popsicles by their outer appearance.  It’s what’s on the inside that counts.  And if you make these yourself you won’t have to go dig up some change when you hear the ice cream man’s music come rolling through the neighborhood. The best part about these popsicles is that you don’t need to worry about gross ingredients like food coloring and high fructose corn syrup and since they contain real fruit you are giving your kids (and yourself) a treat that you can feel good about.  Have you ever looked at the ingredient list of most store popsicles?  They’re usually not even food. I’m looking forward to trying these with other fruits – I’m thinking mango & lime juice would be good too! This made 6 good sized popsicles out of small solo cups.  Despite using small solo cups they were still pretty large popsicles.  I think if you are using molds you’ll get a few more out of the mixture. It’s strawberry season right now in NH so by all means, use fresh if you can get them!

Ingredients
3/4 can full fat Coconut Milk
8 – 10oz organic fresh or frozen strawberries
8 – 10oz organic fresh or frozen blueberries
4 tbsp raw honey or maple syrup
1 tsp vanilla
pinch of sea salt

Directions
If your honey is very thick or crystallized, you’ll want to melt it first.  You can do this by heating it in the microwave but I prefer to put it in a glass measuring cup and then setting the measuring cup in a bowl of hot water for a couple of minutes.  Once the honey is melted, blend the strawberries with 1 tbsp + 1 tsp of honey, plus a dash of vanilla and a tiny bit of salt.  Once they are well blended, scrape the blender out and set the strawberry mixture aside.  Rinse the blender and then do the same with the blueberries (+ honey, vanilla and salt) and again with the coconut milk, setting each one aside in a separate container.   Once all have been blended, spoon a heaping tbsp of the strawberry mixture into each popsicle mold, then a couple of spoonfuls of coconut milk, then a heaping tbsp of the blueberry mixture and so on until you run out of the mixtures.  Freeze for at least 4 hours before eating.

Freaking out because you don’t have popsicle molds? If you don’t have popsicle molds (I certainly don’t!), you can use small plastic or paper cups instead!  The popsicles won’t look as fancy and they may be a little awkward shaped but it will do. You just pour the mixtures in then cover with plastic wrap and make a small hole for a popsicle stick or plastic fork/spoon, then insert one into each hole.  The plastic wrap will keep the stick in place.  Pop into the freezer and wait patiently.  When the popsicles are frozen you may need to run the sides of each cup under warm water for a few seconds to release the popsicle from the plastic cup.  If you use paper cups you can probably just peel them off.  We used plastic forks in ours in place of popsicle sticks (since we didn’t have those either) and the cool thing about that was as your popsicle starts to melt you can just stick it back in the cup and eat it with the fork that has been acting as your stick.  So fancy.

You don't need popsicle molds to make your own popsicles.  Look around your kitchen, you'll find something that you can use.

You don’t need popsicle molds to make your own popsicles. Take a good look around your kitchen and I’m sure you probably have stuff you can use in a pinch!

I will totally be having one of these tonight! Yum!

Untitled drawing (1)

Wild Cod with Parsley, Lemon & Shallots and Arugula Salad

Wild Cod with Lemon, Parsley and Shallots - can't go wrong.

Wild Cod with Lemon, Parsley and Shallots – can’t go wrong!

Yay for summer!  I secretly (or not so secretly) love heat and humidity but that doesn’t mean I love being in a hot kitchen on those days (like today!).  When it’s a perfect summer day outside, I want to minimize the amount of time I have to spend indoors so I love having quick dinners at my fingertips and that’s where fish and a raw salad come in.

Wild cod takes just a few minutes to cook and a little chopping and slicing is all this arugula salad takes to make.  You can have healthy and delicious dinner on the table in 15 minutes tops.  Feel free to use any white mild tasting fish for this recipe.

If you are brave (and have amazing grill skills), feel free to grill your cod outside.  I find fish a little too delicate to do on the grill with my clunky bear-like coordination (unless it’s on a wood plank).  But by all means show me up with your gracefulness and report back.  And then come over and get grilling, thanks!

A tip for you:  Keep things like parsley, lemon, shallots, garlic, vinegars and oil/butter regularly in your kitchen.  Why?  Because almost anything tastes like you slaved over it when you add some of those ingredients.  Almost any combo of those ingredients makes a delicious salad dressing, chicken marinade, pasta or potato salad dressing and of course in this recipe, a topping for fish.  Get into the habit of keeping a few simple ingredients in your kitchen and you’ll always be able to whip up something delicious at a moments notice.

Ingredients
4 Wild cod fillets (skinned/skinless)
1 tbsp olive oil

1 organic lemon zested and juice reserved*
2/3 cup fresh parsley, chopped
3 tbsp pastured butter
1 large shallot, minced
sea salt to taste

Arugula Salad
4 cups baby arugula, chopped (try other baby greens if you don’t have arugula)
1 pint grape or cherry tomatoes, cut in half
2 large carrots, shredded or sliced thinly
1 tbsp extra virgin olive oil
1 tbsp champagne vinegar
freshly ground black pepper
sea salt to taste

*it’s really important to use an organic lemon in any recipe that uses the peel or zest.  That is where all the pesticides are and they are not easily washed off.  If you are just using the juice of a lemon, conventional is ok but please go for organic when using zest (and rinse well before using anyway).
Arugula salad -a simple and quick way to get a spicy new green into your diet.

Arugula salad -a simple and quick way to get a spicy new green into your diet.

Directions
Cook cod in a hot sauce pan with 1 tbsp olive oil.  Preheat oven to 450 degrees. Heat a large sauce pan over medium heat with 1 tbsp olive oil. When hot, cook the cod for 3-4 minutes on one side, flip and then immediately put in hot oven.  Cook for another 3-4 minutes in the oven (exact time will depend on the thickness of your fillets) and remove when fish is opaque and flakes easily.

While the fish is cooking, heat 1 tbsp of the butter in a small saucepan, cook shallots for 3 minutes or until softened/browning.  Turn off heat and stir in the lemon juice and zest, parsley, sea salt and remaining butter.  Spoon over fish.

Make the arugula salad before you begin making the fish or during (it takes just 5 minutes to make). Chop and prepare all your veggies and then dress with the oil and vinegar, salt and pepper.  Serve the cod and salad immediately.  Enjoy!

Makes 4 servings.

Untitled drawing (1)

Warm Brussels Sprouts Salad with Cranberries and Sunflower Seeds

Warm Brussels Sprout Salad

Warm Brussels Sprout Salad

I know we’re still a few months from Brussels Sprout season but I can’t help myself! Despite trying to eat what’s in season most of the time, I go out of my way to eat Brussels sprouts year round.  I may have hated them as kid (me and everybody else) but as an adult, they are one of my favorite veggies! Roasted, pan fried, steamed – I don’t care! I think they are fab!  This is one of my favorite ways to make them.  It’s super fast (the thing that takes the most time is trimming the sprouts) and simple to make.  Plus, you don’t even need to be much of a cook to pull this one off.

As usual, with most of the food I make, this recipe is a loose guide – if you don’t have cranberries or sunflower seeds, skip them or substitute raisins, chopped dried apricots, fresh blueberries, pumpkin seeds, chopped cashews or hemp seeds.  If you don’t have lemon, use fresh lime juice/lime zest or even vinegar.  It’s no big deal.  The main reason they’re in this salad is to add some additional texture and take some of the bite out of the sprouts.

Not only do they taste amazing, but Brussels sprouts are crazy good for you! They’re an amazing source of vitamin K and vitamin C, and a pretty good source of folate, potassium, B Vitamins (there’s some B1, B2, B3 and B6 in there), fiber and choline.   Try this salad next time you’re looking at sprouts and wondering what to do with them.

Ingredients
4 cups Brussels sprouts, base trimmed, loose / damaged leaves removed
1 tbsp olive oil, butter or melted coconut oil
1/2 cup dried organic cranberries
1/2 cup organic raw sunflower seeds
1 lemon, juiced & zest reserved
1.5 tbsp Extra Virgin Olive Oil (I’m a fan of California Olive Ranch these days)
sea salt and black pepper to taste

photo 1c copy
Directions
After trimming your Brussels sprouts, slice each one 3 or 4 times (so it looks like somewhat shredded cabbage when you are done).  Heat the olive oil (not extra virgin) in a 3 or 4qt pan over medium heat.  When it’s hot, add the sliced/shredded sprouts and saute for about 5 – 7 minutes (or until your desired doneness), stirring occasionally. I like to saute them just until some pieces begin to brown and get crispy but the rest are still pretty firm.

Take them off the heat and toss with lemon juice, lemon zest and the extra virgin olive oil.  Sprinkle with a little salt and pepper and dress with the cranberries and sunflower seeds. Serve warm or at room temperature.  This is a great salad to bring to cookouts when sprouts are in season in late summer!

Makes 4 hearty servings.  Make this a well balanced meal by adding grilled chicken or cannellini beans on top.

Homemade Dairy Free & Soy Free Sour Cream

Cashew Cream (Dairy Free Sour Cream)

Cashew Cream (Dairy Free Sour Cream)

This is probably the easiest recipe you’ll ever see me post but since it’s becoming a frequently made item in my home so I thought it was worth posting.  We’re mostly dairy free these days, after realizing that both of us had issues with it after an elimination diet (to look for sensitivities).  Since then, I’ve also realized that certain dairy products (as well as wheat) for me lead to binge eating behavior and as someone who has worked really hard to have a healthy relationship with food, I’m not interested in keeping those triggers in my life.

So long story short, cashew cream is a fantastic occasional substitute for sour cream (and it even can stand in partially for making a cream cheese frosting – I shit you not).  You might be wondering why I don’t just go out and buy a dairy free sour cream (there’s plenty out there today).  The reason I don’t go that route is because #1 I like to make things from scratch when I can and #2 fake versions of foods are usually filled with lots of yucky stuff, like extra sugar, extra salt, preservatives and processed soy.  No thanks!

I should warn you, if you’re someone who eats a lot of dairy, you’d probably try this and be like “this tastes nothing like sour cream, she’s nuts!!”.  But if you’ve been off the stuff for a while and just want a little bit of creaminess to dollop on top of your chilli, or to top on your baked potato?  I’ve got you covered!

Ingredients
1 cup raw whole unsalted cashews
1/2 cup water
1 tbsp lemon juice
sea salt to taste

Directions
Soak your cashews in water for at least 6-8 hours.  This will soften them so they’ll be super creamy and also remove some of the phytic acid (which interferes with digestion and magnesium, calcium, zinc, and iron absorption).

After soaking, rinse and drain the cashews and then put all ingredients in a blender or food processor.  Blend until smooth and creamy.  Scrape down the sides with a spatula if necessary.

Chill for an hour before serving.   The cashew cream will stay good in the fridge for a week but I don’t think it’ll be in there that long!

Stay tuned, in a few days, I’ll be posting a recipe that makes great use of this stuff! Winter comfort food coming right up!

Untitled drawing (1)